How to make - instructions:
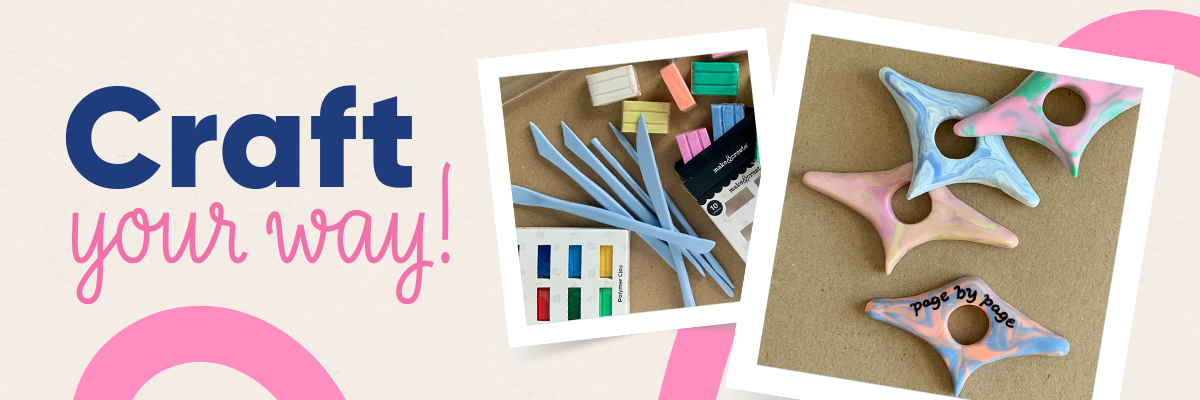
1. Begin by opening a box of polymer clay. Pair up the clay blocks with two different contrasting colours.
2. Unwrap a set of two clay blocks. Knead each block separately in your hands to warm and soften the clay. Create a sausage with each colour. Twist the two sausages together to begin mixing them into one marbled piece. Fold the twisted sausage in half and twist this together. Repeat a couple more times until the clay is rippled with the two colours.

3. Use a pencil to draw an outline shape of the book holder, measuring about 4.5cm high, and 8cm wide. Draw around a spare bottle lid in the centre of the book page holder shape to mark the thumb hole.
Cover the drawn template with a sheet of acetate and sprinkle a little corn flour over the surface. This prevents the clay from sticking to the acetate.
Cover the lid with corn flour and place this down in position. Wrap the marbled clay around the lid and begin shaping it to fit the template using your fingers and the tools.

4. When the clay has been shaped, remove the lid, and turn the book page holder over. Use the acrylic rolling pin to gently roll across the reverse surface. This helps to flatten the top surface of the book page holder.
Flip over the book page holder and make any final adjustments to the shape.

5. Transfer the book page holder to the prepared baking tray and bake according to the instructions on the clay packaging. Allow to cool completely.
Use a black permanent marker pen to write ‘page by page’ — or your own choice of words — on the top surface. Rest the book page holder onto a scrunched up piece of paper towel to make it easier to write onto. These could also be personalised with handwritten names.

Enjoy making a few more thumb book page holders in your chosen paired colour schemes.
The Final Chapter
And just like that, you've created your own DIY polymer clay book page holder! With marbled colours and a personalised touch, it's the perfect mix of practical and pretty. Whether you're gifting to a friend or keeping it for your next cosy reading session, this little project is sure to make turning pages a joy.
After another bookish DIY? Learn how to make a tiny book for a miniature bookshelf for your tbr jar. And if you're looking for another clay project, why not make your own clay photo frame for a handmade keepsake.