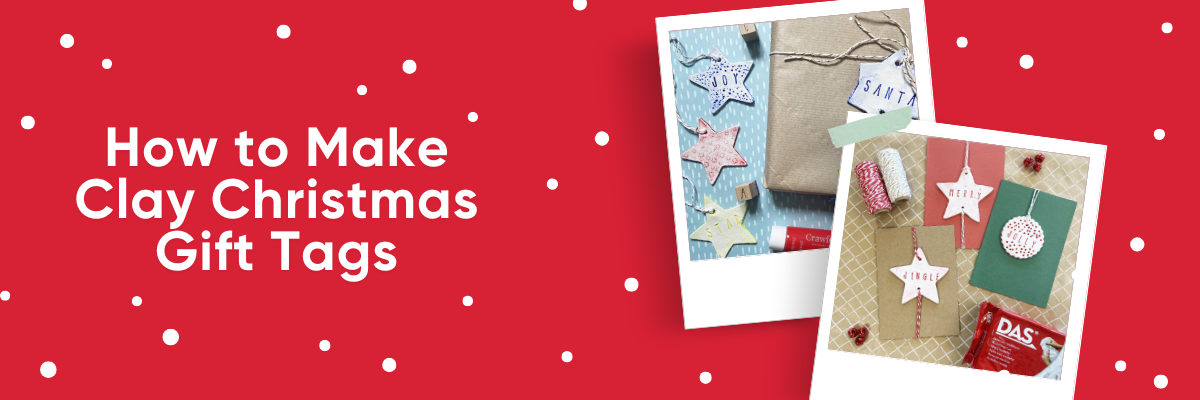
How to Make Clay Christmas Tags
Equipment:
1. A rolling pin
2. Clay modelling tools
3. Wooden letter stamps
4. Cookie cutter
Supplies:
1. DAS clay
2. Red and white twine
3. If you're making cards, you'll also need a pack of blank cards
4. Acrylic paints (optional)
5. Sticky tape
Once you've got your supplies and your equipment ready, just follow these five steps below to make some homemade clay gift tags.
How To Make Clay Gift Tags - Step By Step
1. Clay prep
Take your DAS clay and break off enough to work with. Take your rolling pin, roll out and flatten your clay until it's approximately 5-8mm thick. Don't forget we want a lovely rustic finish, so we're not looking for perfection in your rolling. If you choose to use our festive pattern rolling pin, use it when your clay is flattened and ready to be cut out to create miniature Christmas patterns that will bring your tags to life.
Top Tips:
- - If the clay's cold, you may need to work it with your hands a little first to make it more pliable.
- - To avoid the clay sticking to your work surface, pop down a sheet of greaseproof paper.
2. Cookie cutter time
Use a cookie cutter to cut out your DIY clay tags. We think stars work perfectly! Or if you want that festive feel, then a little Christmas tree is also a great option. Once you've settled on your cutter shape, cut out as many tags as you need and dispose of any leftover clay you can't use.
Top tip:
- - If you've got children who are desperate to get involved, they can't get this bit wrong, so hand them the cookie cutters and watch them go!
3. Personalise your tags
Time to grab your gift list to see who you're making tags for. One by one, use the letter stamps to imprint the names of the friends and family your gifts are for. If you want to give it that extra bit of flair and make it a bit jazzier, use your clay tools or wooden dowels to create texture around the names. You'll be surprised at how effective a few well-placed dents here and there can be.
If you're creating card embellishments, decorations, or ornaments for the tree, then add your favourite Christmas words on your DIY clay tags. The clay tags are pretty small, so we'd recommend keeping it simple with something like Ho! Ho! Ho! or Merry Christmas.
Now that you've got the message down, it is time to create a hole through your tag. This is the hole through which you will later feed your twine. To make the hole, take each tag, push a piece of dowel through at the top of your shape, and then set it aside. If you're going to create handmade Christmas cards with your tags, put a hole at the bottom of your tags.
4. Allow your tags to harden
If you're not using DAS Modelling Clay, this is about the time where you'd pop them in the oven. But thankfully, you're not, so you can let them air dry.
The thicker you've made your tags, the longer they'll take to completely dry out, so bear this in mind during step 1 when you're rolling them out.
With the DIY clay tags to one side, it's time to pop the kettle on or pour yourself a cheeky Christmas drink and put your feet up.
5. Finishing your tag
Once your clay tags have completely dried out, you can put the finishing touches on them. This is where you can let your imagination run wild and do whatever you want to decorate it. You can paint them or even add varnish for a little bit of shimmer. Our only word of warning is that clay tags are meant to feel natural and rugged, so try not to overdo it.
Once any added paint has dried, take a length of red and white twine, feed it through the top hole you made earlier and then tie it on.
From Clay to Keepsake
And just like that, five simple steps and you’ve got your own charming DIY clay tags, perfect for gifting, decorating, or adding a handmade touch to your Christmas cards.
This craft is ideal for both beginners and little hands, making it a joyful activity for the whole family. Best of all, when you share these rustic beauties, you’ll get that heartwarming holiday glow seeing how much they’re loved. Don’t be surprised if someone asks where you bought them, you’ll get to smile and say, “I made them myself!”
So take a deep breath, embrace the imperfections, and enjoy the process. These clay tags are meant to be delightfully rough around the edges — just like all the best holiday memories.