Easter is such a lovely time to slow down, get creative, and enjoy some simple, screen‑free fun with little hands taking the lead. These easy Easter crafts for kids are wonderfully accessible —wobbly lines are encouraged, toilet rolls become tools, and children can happily create on their own with just a few gentle prompts. Each idea is designed to be low‑prep, low‑mess, and full of that joyful, handmade charm that makes spring crafting so special. If you’re looking for simple Easter activities that encourage independence and spark imagination, you’re in exactly the right place.
5 Easy Easter Craft Ideas
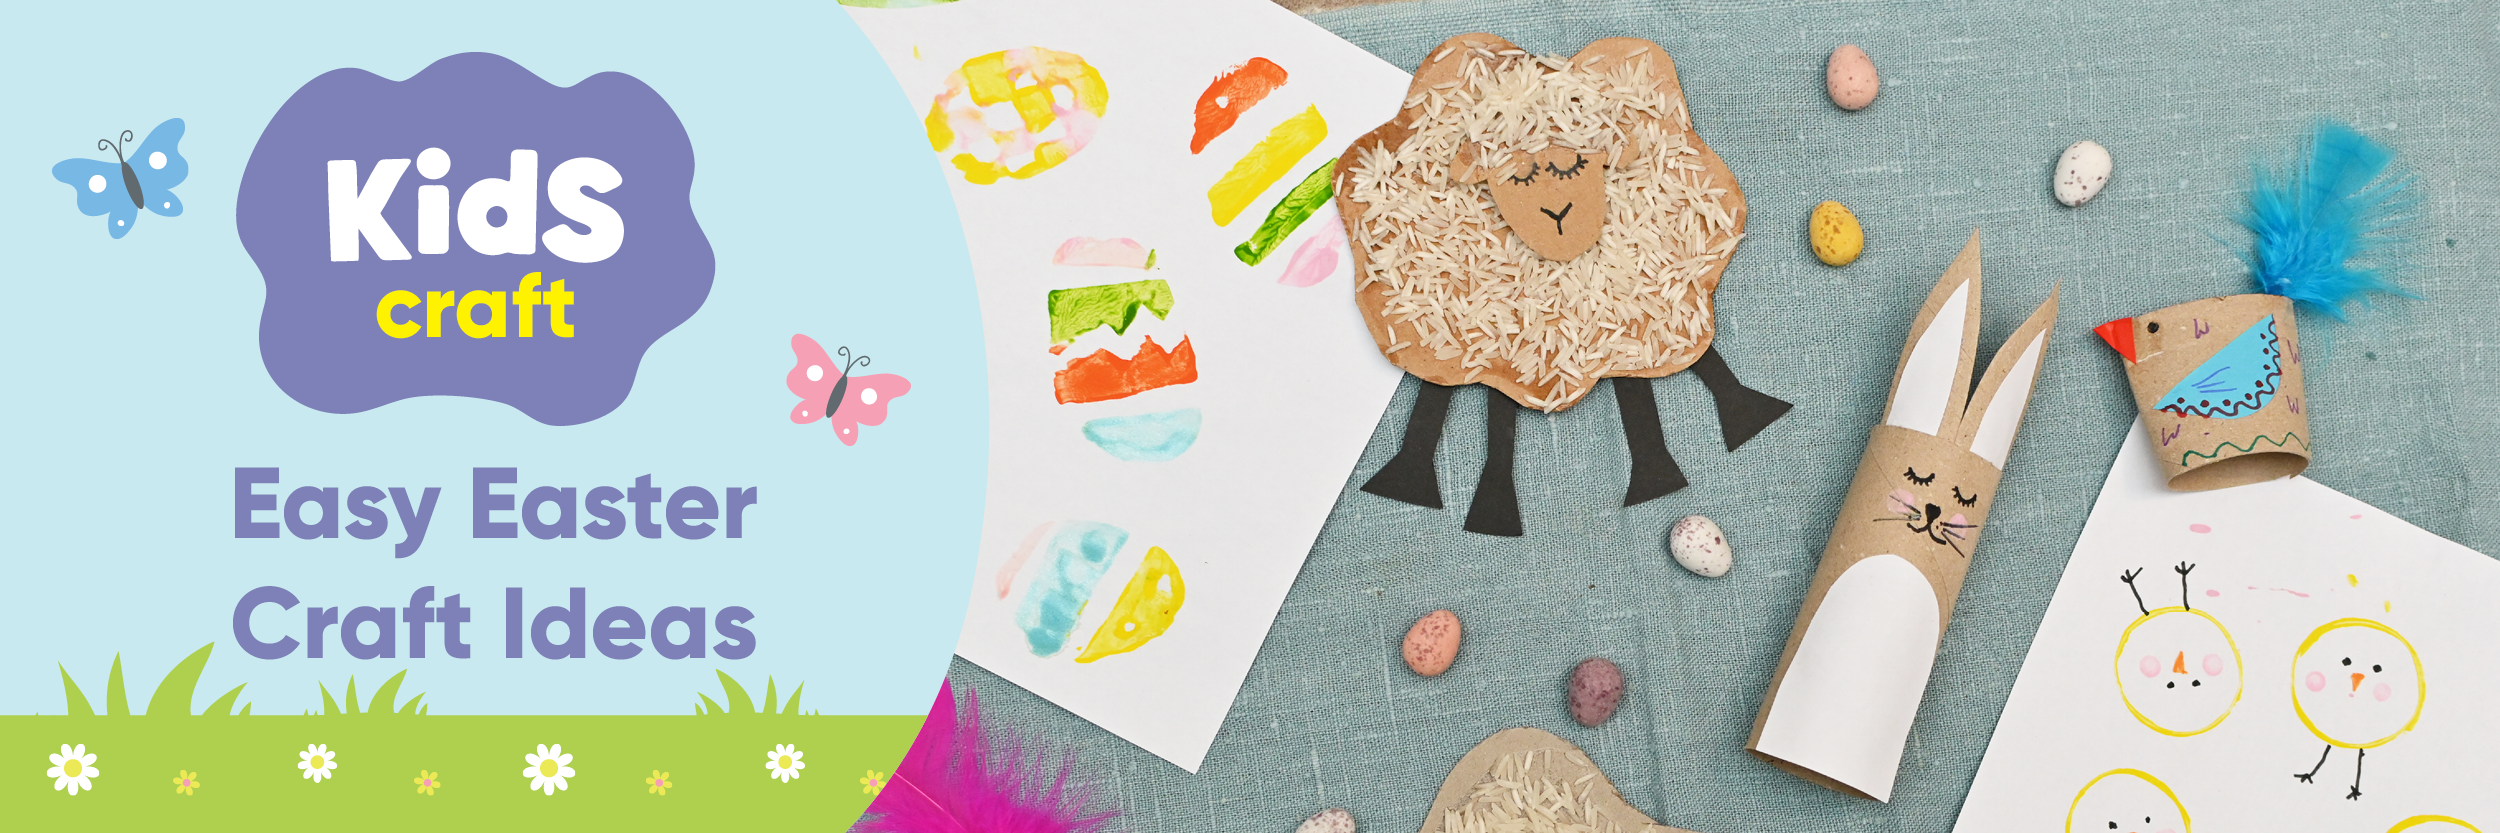
These easy Easter ideas are all about keeping things relaxed, screen‑free, and joyfully imperfect, giving kids the freedom to explore, experiment, and proudly say, “I made this myself.”
1. Printed Chicks

Materials:
- Yellow paint
- Pink paint
- Black and orange felt tip pens
- Toilet roll tube
- Cotton bud
Instructions:
Step 1: Pour some yellow paint onto a paint tray and then dip in the end of the toilet tube and then print firmly onto the paper to create the chicks body.
Step 2: Draw some eyes, a beak and some legs with a pen onto the body. Then dip a cotton bud into some pink paint and print onto the face to create rosy cheeks.
2. Potato Printed Easter Eggs

Materials:
- Paint
- Paint brushes
- Knife for cutting potatoes (adult use)
- New potatoes
Instructions:
Step 1: Slice the potatoes in half vertically
Step 2: Cut some simple patterns in the potatoes, stripes, star-busts, or little gouges to make spots.
- Tip: For a neater finish you could use cookie cutters in larger potatoes - however, the wobbly nature of these patterns is all part of the joy
Step 3: Stamp your painted potatoes onto your paper or card to create little pieces of art or handmade Easter cards.
3. Toilet Roll Rabbit

Materials:
- White paper
- Black felt tip pen
- 2 Toilet roll tubes
- Cotton bud
- Scissors
Instructions:
Step 1: Take one of the toilet tubes, cut down the middle and flatten it out. Then cut two long pointy ears. Cut some smaller inner ears from the white paper and stick in place.
Step 2: Apply some glue to the edge of the ears and place them inside the top of the toilet tube to secure in place.
Step 3: Cut a small piece of white paper for the tummy and glue it in place.
Step 4: Dip a cotton bud in the pink paint to create the cheeks. Leave to dry.
Step 5: Draw on the face using the black felt tipped pen.
4. Sheep

Materials:
- Cardboard
- Black paper
- Black felt tip pen
- PVA glue
- Rice
- Scissors
Instructions:
Step 1: Cut a rough cloud shape out of cardboard for the sheep’s body and a rough mushroom shape for the head.
Step 2: Apply some glue to the cloud shape and then sprinkle on the rice, leave this to dry. Repeat with the face and then glue on top of the body.
Step 3: Cut some legs from the black paper and then glue onto the back of the sheep’s body.
5. Toilet Roll Hen

Materials:
- Feathers
- Coloured paper
- Felt tip pens
- Glue stick
- PVA glue
- Toilet roll tube
Instructions:
Step 1: Cut the toilet roll tube in half.
Step 2: Apply some glue to the inside of one end of the cardboard tube, take a feather and trap it between the two sides - press it firmly to ensure it sticks together
Step 3: Cut a small triangle for a beak and stick it on with glue.
Step 4: Draw on an eye with the black felt tipped pen.
Step 5: Cut small semi-circle shapes out of the yellow paper for wings and glue them on.
Step 6: Using the felt tipped pens draw on some patterns to create more detailed markings
Independent, Screen‑Free Easter Creativity
These easy Easter crafts for kids are designed to bring simple, screen‑free creativity into spring, using everyday materials like toilet rolls and plenty of joyful, wobbly lines. Each idea encourages independence, imagination, and that wonderfully imperfect charm that makes children’s handmade creations so special. With these simple Easter craft activities, little makers can explore, experiment, and enjoy the satisfaction of creating something all on their own — a lovely way to celebrate the season with colour, creativity, and confidence.


