Normalise giving homemade Easter cards! Yeah, they’re not the first thing we think of when it comes to Easter gifts - that’s usually chocolate - but they’re a brilliant and fun little addition to the day. And with it being in spring, there are so many cute little designs with bunnies, chicks and eggs to choose from.
So whether it’s for an egg hunt or just something to do with the kids in the lead-up to the day, making and giving DIY Easter cards is the new tradition that you never knew you needed.
In this post, we’ve pulled together 5 of our favourite homemade Easter card ideas for inspiration. So if you’re stuck for design ideas this year, you can always fall back on the below.
Enjoy!
Our 5 DIY Easter Card Ideas
1. Handprint Chicken Card (netmums.com)

This card is a simple and really easy card to re-create. It's also the perfect card to make with your little ones and one they’ll enjoy pulling together. With a few simple steps and only a handful of materials needed, this handmade card is the perfect way to spend a rainy day in the lead-up to Easter.
Supplies & materials:
- Paint
- Coloured marker pens
- Paintbrush
Instructions:
1. Using a paintbrush, take your yellow paint and cover your entire palm.
2. Then, press your hand onto the blank card evenly, making sure that the whole of it is touching the card..
3. Gently lift your hand off the card, revealing your handprint. If there’s any patchiness, or it hasn’t come out evenly, you can go back over it with a paintbrush to fill in those patches.
4. Then, take your coloured marker pen and draw the beak, eyes and cheeks where your thumb is.
5. Where the bottom of your palm is, take the marker pen and draw two straight lines downwards and then add the feet onto them.
6. For an added bonus, you can use your fingertips to create little chics.
2. Easter Bunny Card (netmums.com)
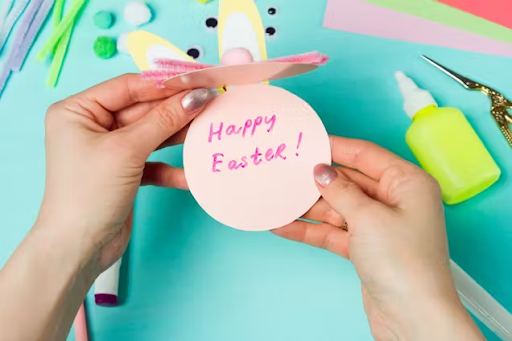
This adorable Easter-themed DIY card can be as loud or as quiet as the person you are giving it to. By swapping out the card colours, you can keep quiet and understated like the photo above, or you can pull in some neons and make it avant-garde. It’s also so simple that it can be made in just a few minutes.
Supplies & materials:
- Coloured card
- Pipe cleaners
- Small pink pom poms
- Marker pens
- Scissors
- PVA glue
Instructions:
1. Take an A5 piece of coloured card, fold it in half and cut it into a circle shape. As you’re cutting it, make sure not to cut the crease of the card.
2. Then take your other coloured cards, cut them into two bunny ear shapes and stick them to the back of the card.
3. Now, take four pipe cleaners, cut them down to size and stick them on either side of the centre on the front of the card to make the whiskers.
4. Finish off by glueing a pink pom pom in the middle of the card to create the nose.
3. Rocking Easter Egg Card (easypeasyandfun.com)
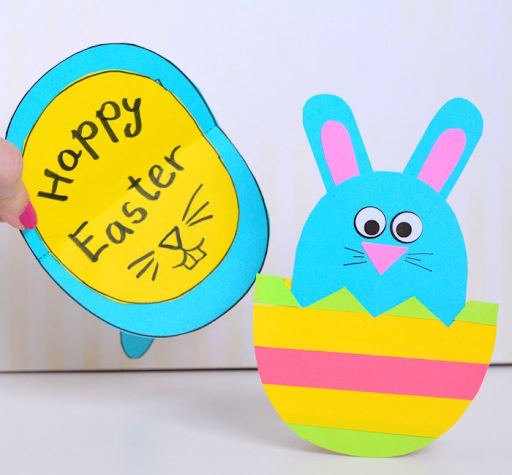
This card is a lot of fun and full of colour. Not only is it a unique take on your standard design, but it is really simple to create, and it only needs a couple of supplies that most crafters will already have. Whoever receives this card will surely love the little characters, and it will take pride of place in their home.
Supplies & materials:
- Variety of coloured card
- Glue stick
- Scissors
- Marker pen
- Googly eyes
Instructions:
1. Using colours of your choice, cut out multiple strips of card around 1-2cm thick.
2. Fold them in half and cut along the crease to double the amount you have.
3. Take a piece of A5 card and glue the strips down the length of the card.
4. Then fold the card in half horizontally and begin to cut out a zig-zag line along the fold to replicate a hatched egg (make sure to leave 2cm on either side of the zig-zag so the card can still be folded).
5. Unfold and cut off the excess to create your egg shape. Make sure the ends aren’t too pointed, as you want the card to still rock. Again make sure not to cut off the crease.
6. Cut out a half-oval shape, feed it through the middle of the card, and use the glue to stick the straight edge to the inside of the card.
7. Then take a different coloured card and cut it into an oval or rectangle (just ensure that it is a few cm smaller than the main body of the card) and stick it on the inside of the card. You can then write any message you want.
8. You can now fold the card to reveal your rocking egg design with a little chick poking out the top.
9. All that’s left is to give the chick some character. Using the leftover card, cut out its beak and wings and glue them on, followed by a pair of googly eyes.
4. Pom Pom Bunny Card (thebestideasforkids.com)
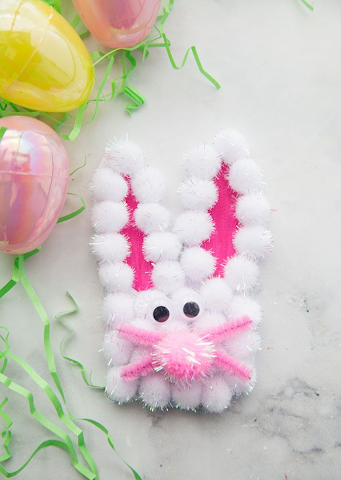
Who doesn’t love a cute fluffy bunny on a card? This card is a quick and easy craft, that is sure to stand out due to:
a) Its fluffiness
b) It doesn’t look like anything that you could easily get in the shops.
So if you want something that is truly one of a kind, then this homemade Easter card is the perfect choice.
Supplies & materials:
- Small Pom poms
- 1 large pom pom
- Google eyes
- Pipe cleaners
- Pink card
- Scissors
- Glue
Instructions:
1. Take your pink card and cut it into the shape of a bunny head. You can draw it out first if that's easier for you.
2. Then take your white small pom poms, line the outside of the ears with them and then glue them down.
3. Then, take a few more white pom poms and cover the face of the bunny with them.
4. Take two pipe cleaners around 10cm in length and cross them over each other to make the whiskers.
5. Finally, stick the pink pom poms on top of the whiskers and stick on a pair of googly eyes.
6. You can then write your message on the back.
5. Pop-Up Easter Chick Card (redtartart.com)
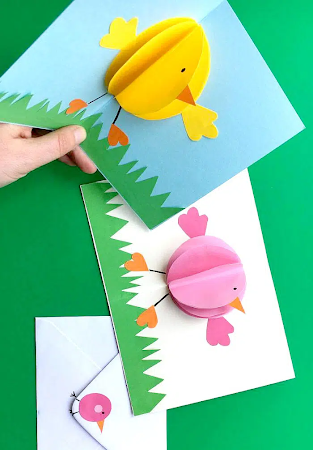
With this handmade card, not only does it really say ‘Happy Easter’ but your loved ones will receive a sweet surprise when they open it. With a simple pop-up design, this cute little chick will make anyone's day. You can also change the design to be a bunny or even an easter egg - if you fancy changing it up a little bit.
Supplies & materials:
- Colourful card
- Scissors
- Marker pen
- PVA glue
Instructions:
1. First, take your card and fold it in half.
2. Then cut out two circle shapes, two wings and a beak.
3. Now, take one of your circles and glue it down the crease of the card, making sure both sides are glued.
4. Then, with your second circle, fold it in half and glue along the crease.
5. Once the glue is slightly tacky, glue it to the crease of the card and hold it for a few seconds whilst the glue sets. Be careful not to close the card until the glue has completely dried.
6. Then you can add your beak, wings and a little dot for its eye.
Happy Easter!
So if you’re in need of an easter card to send this Easter or you just want to try your hand at some crafts, this guide is for you. As well as creating fun little Easter characters with each card, you’ll be able to add a personal touch to each one.
For even more fun this Easter, take a look at our Easter blogs, including, Beyond An Egg Hunt: 8 Fun Easter Games For Kids and Fun and Simple Easter Crafts.
